Der vil blive pakket ordre den 22/12, 23/12, 29/12, og den 30/12. Vi ønsker alle en god jul, og et godt nytår. :)
kr.20.00 inkl. moms
2.4GHz NRF24L01 Trådløs Serial Transceiver Module.
På lager
2.4GHz NRF24L01 Trådløs Serial Transceiver Module, bruges både som transmitter, og receiver. Rækkevide er ca 100 meter. Denne version kan også fås med en antenne.
Wireless rate: 1 or 2 MBPS
SPI interface rate: 0 ~ 8MBPS
125 optional channels work
Channel switching time is very short, can be used for frequency hopping
Fully compatible with nRF24XX series
I/O can accept 5v level of input
±60 ppm 16MHz crystal
Low working voltage: 1.9 ~ 3.6 V (Not 5V)
The global open ISM frequency band, free license to use.
Transmission distance up to 100 meters in outdoor open occasions!
Før du kan starte din programmering skal Arduino’s IDE software hentes. Dette program bruges til at programmere chippen.
Download fra dette link: Downlaod
Inden programmeringen kan udfæres skal den rigtige “COM” port findes. Klik “Værktøj/Port” – og vælg COM port.
Her vises er eksempel på hvordan du kan få LED til at tænde/slukke ved at trykke på en knap et andet sted på et andet board.
Du skal bruge:
NRF24L01 |
Arduino UNO/Nano |
Arduino Mega 2560 |
| VCC | 3.3V | 3.3V |
| GND | GND | GND |
| CSN | Pin 8 | Pin 8 |
| CE | Pin 7 | Pin 7 |
| SCK | Pin 13 | Pin 52 |
| MOSI | Pin 11 | Pin 51 |
| MISO | Pin 12 | Pin 50 |
| Make the connections for the Button as shown in the Circuit Diagram | ||
NRF24L01 |
Arduino UNO/Nano |
Arduino Mega 2560 |
| VCC | 3.3V | 3.3V |
| GND | GND | GND |
| CSN | Pin 8 | Pin 8 |
| CE | Pin 7 | Pin 7 |
| SCK | Pin 13 | Pin 52 |
| MOSI | Pin 11 | Pin 51 |
| MISO | Pin 12 | Pin 50 |
| LED Positive | Pin 3 | Pin 3 |
| LED Negative | GND through 100 ohm resistor | GND through 100 ohm resistor |
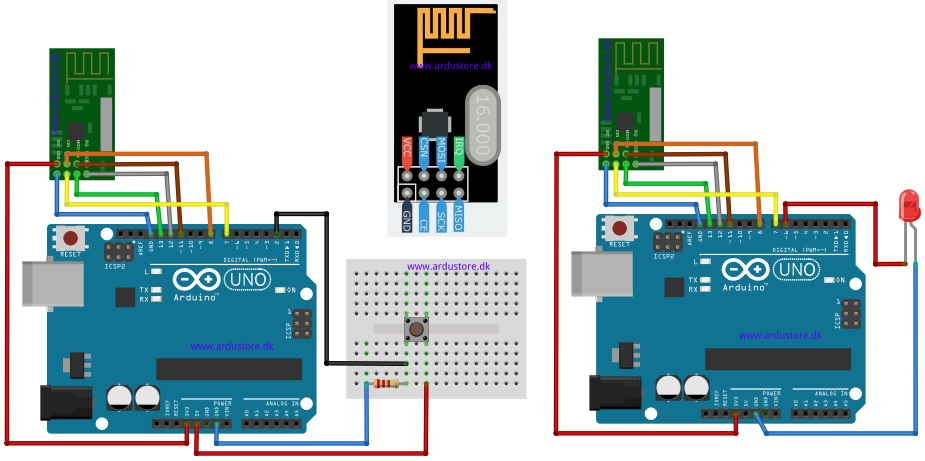
Info: Modulet kan ikke tåle at få “GND” ind på VCC”. Modulet bliver varm og går istykker. “GND” og “VCC” skal passe som vist på tegningen.
Kode: Resiver
#include <SPI.h>
#include <nRF24L01.h>
#include <RF24.h>

RF24 radio(7, 8); // CE, CSN
const byte address[6] = "00001";

boolean button_state = 0;
int led_pin = 6;

void setup() {
pinMode(led_pin, OUTPUT);
Serial.begin(9600);
radio.begin();
radio.openReadingPipe(0, address);   //Setting the address at which we will receive the data
radio.setPALevel(RF24_PA_MIN);       //You can set this as minimum or maximum depending on the distance between the transmitter and receiver.
radio.startListening();              //This sets the module as receiver
}

void loop()
{
if (radio.available())              //Looking for the data.
{
char text[32] = "";                 //Saving the incoming data
radio.read(&text, sizeof(text));    //Reading the data
radio.read(&button_state, sizeof(button_state));    //Reading the data
if(button_state == HIGH)
{
digitalWrite(led_pin, HIGH);
Serial.println(text);
}
else
{
digitalWrite(led_pin, LOW);
Serial.println(text);}
}
delay(5);
}
Kode: Transmitter
#include <SPI.h>
#include <nRF24L01.h>
#include <RF24.h>

RF24 radio(7, 8); // CE, CSN
const byte address[6] = "00001";     //Byte of array representing the address. This is the address where we will send the data. This should be same on the receiving side.

int button_pin = 2;
boolean button_state = 0;

void setup() {
pinMode(button_pin, INPUT);
radio.begin();                  //Starting the Wireless communication
radio.openWritingPipe(address); //Setting the address where we will send the data
radio.setPALevel(RF24_PA_MIN);  //You can set it as minimum or maximum depending on the distance between the transmitter and receiver.
radio.stopListening();          //This sets the module as transmitter
}

void loop()
{
button_state = digitalRead(button_pin);
if(button_state == HIGH)
{
const char text[] = "Your Button State is HIGH";
radio.write(&text, sizeof(text));                  //Sending the message to receiver
}
else
{
const char text[] = "Your Button State is LOW";
radio.write(&text, sizeof(text));                  //Sending the message to receiver
}
radio.write(&button_state, sizeof(button_state));  //Sending the message to receiver

}
Du er altid velkommen til at kontakte os på info@ardustore.dk, eller sende os en besked via messenger (Klik her) og vi vil hjælpe dig.
På lager
Tilføj til kurv
Udsolgt - Send mail
Læs mere
På lager
Tilføj til kurv
På lager
Tilføj til kurv
På lager
Tilføj til kurv
På lager
Tilføj til kurv
På lager
Tilføj til kurv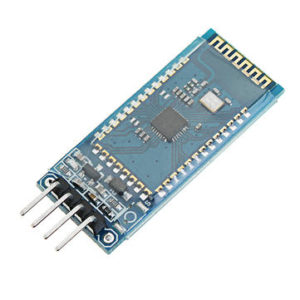
På lager
Tilføj til kurv
Anmeldelser
Der er endnu ikke nogle anmeldelser.