Der vil blive pakket ordre den 22/12, 23/12, 29/12, og den 30/12. Vi ønsker alle en god jul, og et godt nytår. :)
ADS1115 ADC Amplifier 16 Bit I2C Module er for mikrocontrollere uden en analog-til-digital-konverter, eller når du ønsker en ADC med højere præcision, giver ADS1115 16-
bit præcision ved 860 samples/sekund over I2C. Chippen kan konfigureres som 4 single-ended input-kanaler eller to differentialkanaler. Som en god bonus inkluderer den endda en programmerbar forstærker, op til x16, for at hjælpe med at booste mindre enkelt-/differentielle signaler til hele området. Vi kan godt lide denne ADC, fordi den kan køre fra 2V til
5V strøm/logik, kan måle en lang række signaler og den er super nem at bruge. Det er en fantastisk generel 16 bit konverter. Chippen er ret lille, så den kommer på et breakout board med ferriter for at holde AVDD og AGND stille. Interfacet sker via I2C. Adressen kan ændres til en af fire muligheder (se databladet tabel 5), så du kan have op til 4 ADS1115’er tilsluttet på en enkelt 2-leder I2C-bus til 16 enkelt-endede indgange.
Dimensions: 2.8MM x 1.8MM
Working Voltage: 2 to 5V
Working Current: 150 µA
Number of input channels: 4
Working Temperature: –40°C to +125°C
Interface type:I2C
Driver IC: ADS1115_WE
Her vises et eksempel på hvordan man nemt og hurtigt kan lave en spændingsmåler som tager en måling hvert 15 sekund og i dette tilfælde måler den 3,3 volt fra arduinoen 3.3V udgangen.
Displayet har en I2C adresse, den skal findes før displayet kan vise noget. Adressen indsættes i koden som vises længere mede.
Du skal bruge:
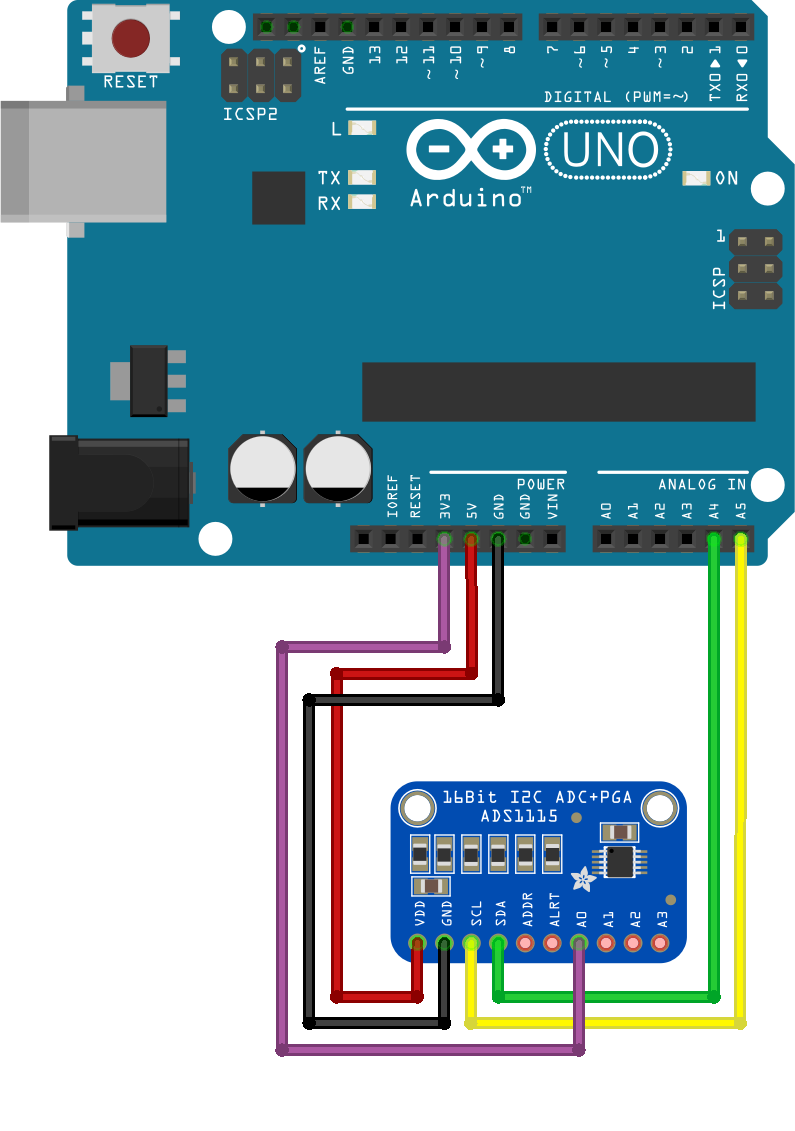
Forbind det sådan:
VCC (Modul) – 5V (Arduino)
GND (Modul) – GND (Arduino)
SCL (Modul) – A5 (Arduino)
SDA (Modul) – A4 (Arduino)
A0 (Modul) – 3.3V (Arduino)
#include <Wire.h>

void setup()
{
  Wire.begin();

  Serial.begin(9600);
  while (!Serial);             //  wait for serial monitor
  Serial.println("nI2C Scanner");
}


void loop()
{
  byte error, address;
  int nDevices;

  Serial.println("Scanning...");

  nDevices = 0;
  for(address = 1; address < 127; address++ )
  {
    // The i2c_scanner uses the return value of
    // the Write.endTransmisstion to see if
    // a device did acknowledge to the address.
    Wire.beginTransmission(address);
    error = Wire.endTransmission();

    if (error == 0)
    {
      Serial.print("I2C device found at address 0x");
      if (address<16)
        Serial.print("0");
      Serial.print(address,HEX);
      Serial.println("  !");

      nDevices++;
    }
    else if (error==4)
    {
      Serial.print("Unknown error at address 0x");
      if (address<16)
        Serial.print("0");
      Serial.println(address,HEX);
    }
  }
  if (nDevices == 0)
    Serial.println("No I2C devices foundn");
  else
    Serial.println("donen");

  delay(5000);           // wait 5 seconds for next scan
}
Nu har jeg fundet adressen på displayet. Min er “0x3C”
/***************************************************************************
* Example sketch for the ADS1115_WE library
*
* This sketch shows how you can use the conversion ready bit with the isBusy function.
* This does not work in the continuous mode.
*
* Further information can be found on:
* https://wolles-elektronikkiste.de/ads1115 (German)
* https://wolles-elektronikkiste.de/en/ads1115-a-d-converter-with-amplifier (English)
*
***************************************************************************/

#include<ADS1115_WE.h>
#include<Wire.h>
#define I2C_ADDRESS 0x3C

/* There are several ways to create your ADS1115_WE object:
* ADS1115_WE adc = ADS1115_WE(); -> uses Wire / I2C Address = 0x48
* ADS1115_WE adc = ADS1115_WE(I2C_ADDRESS); -> uses Wire / I2C_ADDRESS
* ADS1115_WE adc = ADS1115_WE(&Wire); -> you can pass any TwoWire object / I2C Address = 0x48
* ADS1115_WE adc = ADS1115_WE(&Wire, I2C_ADDRESS); -> all together
*/
ADS1115_WE adc = ADS1115_WE(I2C_ADDRESS);

void setup() {
Wire.begin();
Serial.begin(9600);
if(!adc.init()){
Serial.println("ADS1115 not connected!");
}

/* Set the voltage range of the ADC to adjust the gain
* Please note that you must not apply more than VDD + 0.3V to the input pins!
*
* ADS1115_RANGE_6144 -> +/- 6144 mV
* ADS1115_RANGE_4096 -> +/- 4096 mV
* ADS1115_RANGE_2048 -> +/- 2048 mV (default)
* ADS1115_RANGE_1024 -> +/- 1024 mV
* ADS1115_RANGE_0512 -> +/- 512 mV
* ADS1115_RANGE_0256 -> +/- 256 mV
*/
adc.setVoltageRange_mV(ADS1115_RANGE_6144); //comment line/change parameter to change range

/* Set the inputs to be compared
*
* ADS1115_COMP_0_1 -> compares 0 with 1 (default)
* ADS1115_COMP_0_3 -> compares 0 with 3
* ADS1115_COMP_1_3 -> compares 1 with 3
* ADS1115_COMP_2_3 -> compares 2 with 3
* ADS1115_COMP_0_GND -> compares 0 with GND
* ADS1115_COMP_1_GND -> compares 1 with GND
* ADS1115_COMP_2_GND -> compares 2 with GND
* ADS1115_COMP_3_GND -> compares 3 with GND
*/
adc.setCompareChannels(ADS1115_COMP_0_GND); //comment line/change parameter to change channels

/* Set number of conversions after which the alert pin will assert
* - or you can disable the alert
*
* ADS1115_ASSERT_AFTER_1 -> after 1 conversion
* ADS1115_ASSERT_AFTER_2 -> after 2 conversions
* ADS1115_ASSERT_AFTER_3 -> after 3 conversions
* ADS1115_DISABLE_ALERT -> disable comparator / alert pin (default)
*/
//adc.setAlertPinMode(ADS1115_ASSERT_AFTER_1); //uncomment if you want to change the default

/* Set the conversion rate in SPS (samples per second)
* Options should be self-explaining:
*
* ADS1115_8_SPS
* ADS1115_16_SPS
* ADS1115_32_SPS
* ADS1115_64_SPS
* ADS1115_128_SPS (default)
* ADS1115_250_SPS
* ADS1115_475_SPS
* ADS1115_860_SPS
*/
adc.setConvRate(ADS1115_8_SPS); //comment line/change parameter to change SPS

/* Set continuous or single shot mode:
*
* ADS1115_CONTINUOUS -> continuous mode
* ADS1115_SINGLE -> single shot mode (default)
*
* Continuous mode does not work with conversion ready (isBusy), but it works with the
* conversion ready alert pin. Confusing, but that's a property of the ADS1115 and not
* a property of the library.
*/
// adc.setMeasureMode(ADS1115_CONTINUOUS); // continuous mode does not work with conversion ready (isBusy)

/* Choose maximum limit or maximum and minimum alert limit (window) in volts - alert pin will
* assert when measured values are beyond the maximum limit or outside the window
* Upper limit first: setAlertLimit_V(MODE, maximum, minimum)
* In max limit mode the minimum value is the limit where the alert pin assertion will be cleared (if
* not latched)
*
* ADS1115_MAX_LIMIT
* ADS1115_WINDOW
*
*/
//adc.setAlertModeAndLimit_V(ADS1115_MAX_LIMIT, 3.0, 1.5); //uncomment if you want to change the default

/* Enable or disable latch. If latch is enabled the alert pin will assert until the
* conversion register is read (getResult functions). If disabled the alert pin assertion will be
* cleared with next value within limits.
*
* ADS1115_LATCH_DISABLED (default)
* ADS1115_LATCH_ENABLED
*/
//adc.setAlertLatch(ADS1115_LATCH_ENABLED); //uncomment if you want to change the default

/* Sets the alert pin polarity if active:
*
* ADS1115_ACT_LOW -> active low (default)
* ADS1115_ACT_HIGH -> active high
*/
//adc.setAlertPol(ADS1115_ACT_LOW); //uncomment if you want to change the default

/* With this function the alert pin will assert, when a conversion is ready.
* In order to deactivate, use the setAlertLimit_V function
*/
//adc.setAlertPinToConversionReady(); //uncomment if you want to change the default

Serial.println("ADS1115 Example Sketch - Single Shot, Conversion Ready (isBusy) controlled");
Serial.println();
}

void loop() {
float voltage = 0.0;
for(int i=0; i<32; i++){ // counter is 32, conversion rate is 8 SPS --> 4s
adc.startSingleMeasurement();
while(adc.isBusy()){}
}
voltage = adc.getResult_V(); // alternative: getResult_mV for Millivolt
Serial.print("Channel 0 vs GND [V]: ");
Serial.println(voltage);
Serial.println("-------------------------------");
}
Du er altid velkommen til at kontakte os på info@ardustore.dk, eller sende os en besked via messenger (Klik her) og vi vil hjælpe dig.
På lager
Tilføj til kurv
På lager
Tilføj til kurv
På lager
Tilføj til kurv
På lager
Tilføj til kurv
På lager
Tilføj til kurv
På lager
Tilføj til kurv
På lager
Tilføj til kurv
På lager
Tilføj til kurv
Anmeldelser
Der er endnu ikke nogle anmeldelser.