Der vil blive pakket ordre den 22/12, 23/12, 29/12, og den 30/12. Vi ønsker alle en god jul, og et godt nytår. :)
kr.235.00 inkl. moms
ESP32-2432S028R WiFI Bluetooth Smart TFT 2.8T Display.
Udsolgt - Send mail
ESP32-2432S028R WiFI Bluetooth Smart TFT 2.8T Display er et ESP32-WROOM-32-modul, kommer med en 2,8-tommer TFT-berøringsskærm LCD, et microSD-kortinterface, en RGB LED og alle de nødvendige kredsløb til at programmere og tilføre strøm til kortet.
Dual-core MCU, integrated WI-FI and Bluetooth functions
Frequency can reach 240MHz
520KB SRAM, 448KB ROM, Flash size is 4MB
Module size 50.0×86.0mm
Operating Voltage: 5V
Power consumption: approximately 115mA
Product weight: approximately 50g
The module includes:
2.8-inch color TFT display screen with ILI9341 driver chip
Display resolution: 240x320px with resistive touchscreen
Backlight control circuit
TF card interface for external storage
Serial interface
Temperature and humidity sensor interface (DHT11 interface) and reserved IO port interface
It can be programmed with: Arduino IDE, MicroPython, ESP-IDF
In the Extended GPIO connectors, there are at least 4 GPIOs available: GPIO 35, GPIO 22, GPIO 21, and GPIO 27. It also has the TX/RX pins available
Før du kan starte din programmering skal Arduino’s IDE software hentes. Dette program bruges til at programmere chippen.
Download fra dette link: Downlaod
Inden programmeringen kan udføres skal den rigtige “COM” port findes. Klik “Værktøj/Port” – og vælg COM port.
For at bruge TFT_eSPI-biblioteket korrekt, skal du bruge en konfigurationsfil kaldet User_Setup.h med de rigtige definitioner. Vi har allerede forberedt den fil, så du ikke har nogen konfigurationsproblemer efter vores eksempler. Du skal bare downloade den og flytte den til den rigtige mappe.
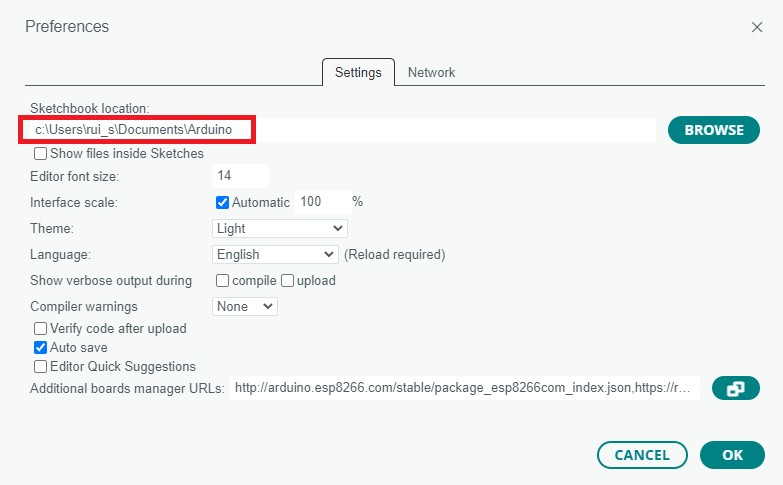
Følgende kode viser en simpel tekst på dit TFT-display og giver dig mulighed for at teste berøringsskærmen. Når du trykker på berøringsskærmen med din finger eller pen, skal den udskrive koordinaterne og trykket.
RGB LED Setup:
BLUE Pin 17
RED Pin 4
GREEN Pin 16
Design egen Display layout:
Det er muligt at designe sot egen display layout med “LVGL 9 Library”
#include <SPI.h>
#include <TFT_eSPI.h>

// Install the "XPT2046_Touchscreen" library by Paul Stoffregen to use the Touchscreen - https://github.com/PaulStoffregen/XPT2046_Touchscreen
// Note: this library doesn't require further configuration
#include <XPT2046_Touchscreen.h>

TFT_eSPI tft = TFT_eSPI();

// Touchscreen pins

#define XPT2046_IRQ 36   // T_IRQ
#define XPT2046_MOSI 32  // T_DIN
#define XPT2046_MISO 39  // T_OUT
#define XPT2046_CLK 25   // T_CLK
#define XPT2046_CS 33    // T_CS

SPIClass touchscreenSPI = SPIClass(VSPI);
XPT2046_Touchscreen touchscreen(XPT2046_CS, XPT2046_IRQ);

#define SCREEN_WIDTH 320
#define SCREEN_HEIGHT 240
#define FONT_SIZE 2

// Touchscreen coordinates: (x, y) and pressure (z)
int x, y, z;

// Print Touchscreen info about X, Y and Pressure (Z) on the Serial Monitor
void printTouchToSerial(int touchX, int touchY, int touchZ) {

  Serial.print("X = ");
  Serial.print(touchX);
  Serial.print(" | Y = ");
  Serial.print(touchY);
  Serial.print(" | Pressure = ");
  Serial.print(touchZ);
  Serial.println();

}

// Print Touchscreen info about X, Y and Pressure (Z) on the TFT Display
void printTouchToDisplay(int touchX, int touchY, int touchZ) {

  // Clear TFT screen
  tft.fillScreen(TFT_WHITE);
  tft.setTextColor(TFT_BLACK, TFT_WHITE);
  int centerX = SCREEN_WIDTH / 2;
  int textY = 80;

  String tempText = "X = " + String(touchX);
  tft.drawCentreString(tempText, centerX, textY, FONT_SIZE);
  textY += 20;
  tempText = "Y = " + String(touchY);
  tft.drawCentreString(tempText, centerX, textY, FONT_SIZE);
  textY += 20;
  tempText = "Pressure = " + String(touchZ);
  tft.drawCentreString(tempText, centerX, textY, FONT_SIZE);

}

void setup() {

  Serial.begin(115200);

  // Start the SPI for the touchscreen and init the touchscreen
  touchscreenSPI.begin(XPT2046_CLK, XPT2046_MISO, XPT2046_MOSI, XPT2046_CS);
  touchscreen.begin(touchscreenSPI);

  // Set the Touchscreen rotation in landscape mode
  // Note: in some displays, the touchscreen might be upside down, so you might need to set the rotation to 3: touchscreen.setRotation(3);
  touchscreen.setRotation(1);

  // Start the tft display
  tft.init();

  // Set the TFT display rotation in landscape mode
  tft.setRotation(1);

  // Clear the screen before writing to it
  tft.fillScreen(TFT_WHITE);
  tft.setTextColor(TFT_BLACK, TFT_WHITE);

  // Set X and Y coordinates for center of display
  int centerX = SCREEN_WIDTH / 2;
  int centerY = SCREEN_HEIGHT / 2;
  tft.drawCentreString("Hello, world!", centerX, 30, FONT_SIZE);
  tft.drawCentreString("Touch screen to test", centerX, centerY, FONT_SIZE);

}

void loop() {

  // Checks if Touchscreen was touched, and prints X, Y and Pressure (Z) info on the TFT display and Serial Monitor
  if (touchscreen.tirqTouched() && touchscreen.touched()) {

    // Get Touchscreen points
    TS_Point p = touchscreen.getPoint();

    // Calibrate Touchscreen points with map function to the correct width and height
    x = map(p.x, 200, 3700, 1, SCREEN_WIDTH);
    y = map(p.y, 240, 3800, 1, SCREEN_HEIGHT);
    z = p.z;

    printTouchToSerial(x, y, z);
    printTouchToDisplay(x, y, z);

    delay(100);

  }
}
Du er altid velkommen til at kontakte os på info@ardustore.dk, eller sende os en besked via messenger (Klik her) og vi vil hjælpe dig.
Udsolgt - Send mail
Læs mere
På lager
Tilføj til kurv
På lager
Tilføj til kurv
På lager
Tilføj til kurvTelefonen har åben:
Mandag – Fredag 07.00 – 16.00
Kontakt os:
Mail: info@ardustore.dk
Telefon: 41403333
Virksomheden:
Ardustore.dk
Klinkbjerg 4B
6200 Åbenrå
CVR: 39973804
Afhentning: Ordren som afhentes bliver lagt i postkassen som er låst med en kode. Koden kommer i den mail som sendes når pakken kan afhentes. Vores postkasse er på væggen i gården.
Vi er meget mere ind bare en webshop, vi tilbyder også forskellige service.
– Udvikling af egen PCB print
– Salg af komplet styringer
– Software udvikling
– Programmering
– 3D Design af kasser
Skriv til os på info@ardustore.dk
Vi vil prøve noget nyt! Der findes ingen sider i Danmark som tilbyder forums inde for Arduino! Derfor har vi prøvet at lave et lille univers for Arduino entusiaster.


Telefonen har åben:
Mandag – Fredag 07.00 – 16.00
Kontakt os:
Mail: info@ardustore.dk
Telefon: 41403333
Virksomheden:
Ardustore.dk
Klinkbjerg 4B
6200 Åbenrå
CVR: 39973804
Webshoppen er ikke en butik som kan besøges. Men det er muligt at afhente ordre, dog efter aftale via mail eller tlf. (Også i weekenden)
Afhentning: Ordren som afhentes bliver lagt i postkassen som er låst med en kode. Koden kommer i den mail som sendes når pakken kan afhentes.
Vi er meget mere ind bare en webshop, vi tilbyder også forskellige service.
– Udvikling af egen PCB print
– Salg af komplet styringer
– Software udvikling
– Programmering
– 3D Design af kasser
Skriv til os på info@ardustore.dk
Vi vil prøve noget nyt! Der findes ingen sider i Danmark som tilbyder forums inde for Arduino! Derfor har vi prøvet at lave et lille univers for Arduino entusiaster.


Anmeldelser
Der er endnu ikke nogle anmeldelser.