Der vil blive pakket ordre den 22/12, 23/12, 29/12, og den 30/12. Vi ønsker alle en god jul, og et godt nytår. :)
KY-004 Tryk Knap Module bruges som en switch module til projekter, hvor du ment kan bruge den som en digital afbryder.
Rating: 50mA 12VDC.
Contact Resistance : 50mΩ max. (initial)
Insulation Resistance: 100MΩ.(minDC 250V)
Dielectric Strength : AC250V.(50/60Hz for 1minute)
Electrically Life: 100,000cycles.
Environment Temperature: -25℃~+105℃.
Operating Force: 180/230.(±20gf)
Seal Temperature: 250℃-280℃.
Her viser vi et hurtig eksempel på hvordan du sammen sætter dette modul til en “Arduino Uno R3”, Brug “Knappen” til at aktivere LED On/Off.
Du skal bruge:
Alle dele kan købes i webshoppen. Klik på navnet for at blive viderestillet til produktet.
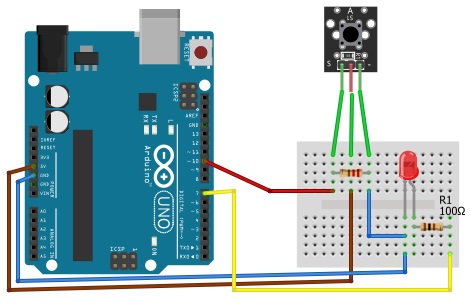
Kode (Engangs tryk – Forbliver On/Off)
int ButtomPin = 10;         // the number of the input pin
int LEDPin = 7;       // the number of the output pin

int state = HIGH;      // the current state of the output pin
int reading;           // the current reading from the input pin
int previous = LOW;    // the previous reading from the input pin

// the follow variables are long's because the time, measured in miliseconds,
// will quickly become a bigger number than can be stored in an int.
long time = 0;         // the last time the output pin was toggled
long debounce = 200;   // the debounce time, increase if the output flickers

void setup()
{
  pinMode(ButtomPin, INPUT);
  pinMode(LEDPin, OUTPUT);
}

void loop()
{
  reading = digitalRead(ButtomPin);

  // if the input just went from LOW and HIGH and we've waited long enough
  // to ignore any noise on the circuit, toggle the output pin and remember
  // the time
  if (reading == HIGH && previous == LOW && millis() - time > debounce) {
    if (state == HIGH)
      state = LOW;
    else
      state = HIGH;

    time = millis();
  }

  digitalWrite(LEDPin, state);

  previous = reading;
}
Kode (On/Off)
// constants won't change. They're used here to
// set pin numbers:
const int buttonPin = 10;     // the number of the pushbutton pin
const int ledPin =  7;      // the number of the LED pin

// variables will change:
int buttonState = 0;         // variable for reading the pushbutton status

void setup() {
  // initialize the LED pin as an output:
  pinMode(ledPin, OUTPUT);
  // initialize the pushbutton pin as an input:
  pinMode(buttonPin, INPUT);
}

void loop() {
  // read the state of the pushbutton value:
  buttonState = digitalRead(buttonPin);

  // check if the pushbutton is pressed.
  // if it is, the buttonState is HIGH:
  if (buttonState == HIGH) {
    // turn LED on:
    digitalWrite(ledPin, HIGH);
  } else {
    // turn LED off:
    digitalWrite(ledPin, LOW);
  }
}
Du er altid velkommen til at kontakte os på info@ardustore.dk, eller sende os en besked via messenger (Klik her) og vi vil hjælpe dig.
På lager
Tilføj til kurv
På lager
Tilføj til kurv
På lager
Tilføj til kurv
På lager
Tilføj til kurvTelefonen har åben:
Mandag – Fredag 07.00 – 16.00
Kontakt os:
Mail: info@ardustore.dk
Telefon: 41403333
Virksomheden:
Ardustore.dk
Klinkbjerg 4B
6200 Åbenrå
CVR: 39973804
Afhentning: Ordren som afhentes bliver lagt i postkassen som er låst med en kode. Koden kommer i den mail som sendes når pakken kan afhentes. Vores postkasse er på væggen i gården.
Vi er meget mere ind bare en webshop, vi tilbyder også forskellige service.
– Udvikling af egen PCB print
– Salg af komplet styringer
– Software udvikling
– Programmering
– 3D Design af kasser
Skriv til os på info@ardustore.dk
Vi vil prøve noget nyt! Der findes ingen sider i Danmark som tilbyder forums inde for Arduino! Derfor har vi prøvet at lave et lille univers for Arduino entusiaster.


Telefonen har åben:
Mandag – Fredag 07.00 – 16.00
Kontakt os:
Mail: info@ardustore.dk
Telefon: 41403333
Virksomheden:
Ardustore.dk
Klinkbjerg 4B
6200 Åbenrå
CVR: 39973804
Webshoppen er ikke en butik som kan besøges. Men det er muligt at afhente ordre, dog efter aftale via mail eller tlf. (Også i weekenden)
Afhentning: Ordren som afhentes bliver lagt i postkassen som er låst med en kode. Koden kommer i den mail som sendes når pakken kan afhentes.
Vi er meget mere ind bare en webshop, vi tilbyder også forskellige service.
– Udvikling af egen PCB print
– Salg af komplet styringer
– Software udvikling
– Programmering
– 3D Design af kasser
Skriv til os på info@ardustore.dk
Vi vil prøve noget nyt! Der findes ingen sider i Danmark som tilbyder forums inde for Arduino! Derfor har vi prøvet at lave et lille univers for Arduino entusiaster.


Anmeldelser
Der er endnu ikke nogle anmeldelser.